What Keywords Does My Website Rank For?

This post follows a recent article discussing how many hits your website gets. This time we take a look at what keywords or search terms your website actually ranks for and how you can find out. After all, your website rank will determine if you get found in the search engines and how much search traffic you get.
FYI, we might call them keywords but Google refers to them as queries.
First off, let’s decide which search engine we’re talking about. According to Statcounter Google UK commanded a whopping 93.5% of the search engine market as of April 2021. Bing came in a long way second at 3.8%, Yahoo 1.5%, Duck Duck Go 0.7%, and Ecosia 0.31% leaving little room for ‘others’.
So we’re largely concerned with Google though we will be discussing Bing as well below.
Source: StatCounter Global Stats – Search Engine Market Share
Google Search Console
The best tool to use to see where you rank in Google is Google Search Console (formerly Google Webmaster Tools). It tells you many things about the state, condition and health of your website but in the context of this article it tells you:
- What keywords you rank for over a given period
- The position of the keyword, e.g. #5 or #50
- How many clicks you received from search on the keyword
- The number of impressions
- The click through rate
Bing has a similar tool called Bing Webmaster Tools and you can pretty much take the same data from both, so while we discuss GSC at some length BWMT is very similar.
And even better … they’re free!!!
So, let’s go through this step by step.
What does Google Search Console NOT tell you about where you rank?
GSC will not tell you who actually visited your site, as in John Smith from 52 Lexington Avenue, Cardiff, or John Doe from Alabama, USA. Why? Because 1) it’s highly confidential, and 2) the search engine may not know anyway as people search from all number of devices (laptop, mobile), at home and at work.
For a better understanding of visitor demographics you need to visit Google Analytics.
Setting up Google Search Console
Head over to Google Search Console and login. If you don’t have an account you can create one for free. You will be prompted to do so.
Once logged in there are two ways to add a domain. The first may require a developer. The second is easier if you have access to your website’s backend:
Add root domain
Perhaps slightly more tricky as you need access to your server which may strike the fear of God into some people.
On the left hand side option, start by adding just the root domain, e.g. “example.com”, with no http:// or www.
Next, you will need to add a TXT record to your server. Search Console will give you details but if you’re stuck ask your developer or IT department.
Once both steps are complete you will then be asked to verify your ownership. That’s it.
Add URL prefixes
This is easier and only takes a few minutes more. It’s quite simple, believe me.
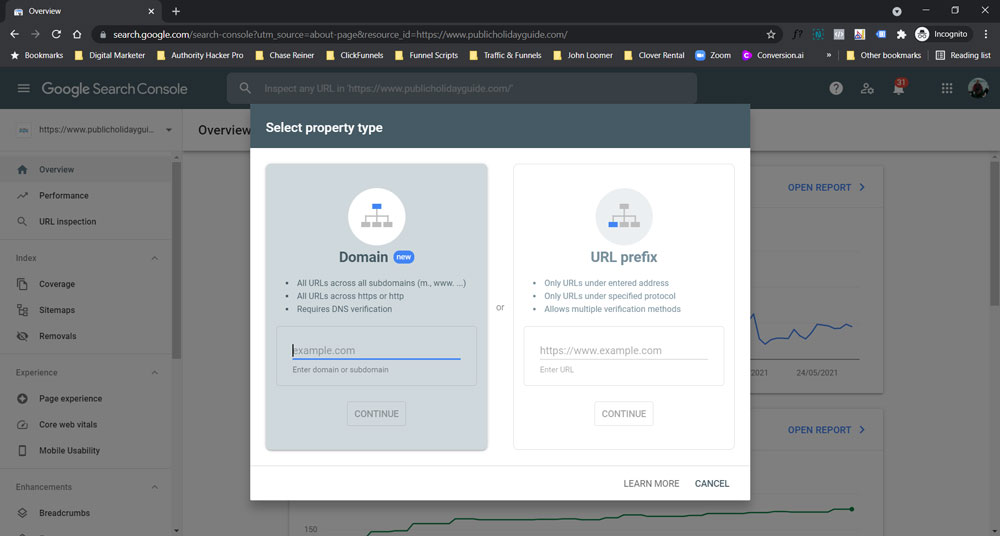
You may or may not realise that the website URL “www.example.com” is different from “example.com” (without the www) and “http://” is different from “https://” (the latter one contains an “s”). For reasons I won’t complicate you with here please just go ahead and follow these steps:
On the right hand side of the prompt, add your domain such as https://www.example.com. Then click Continue.
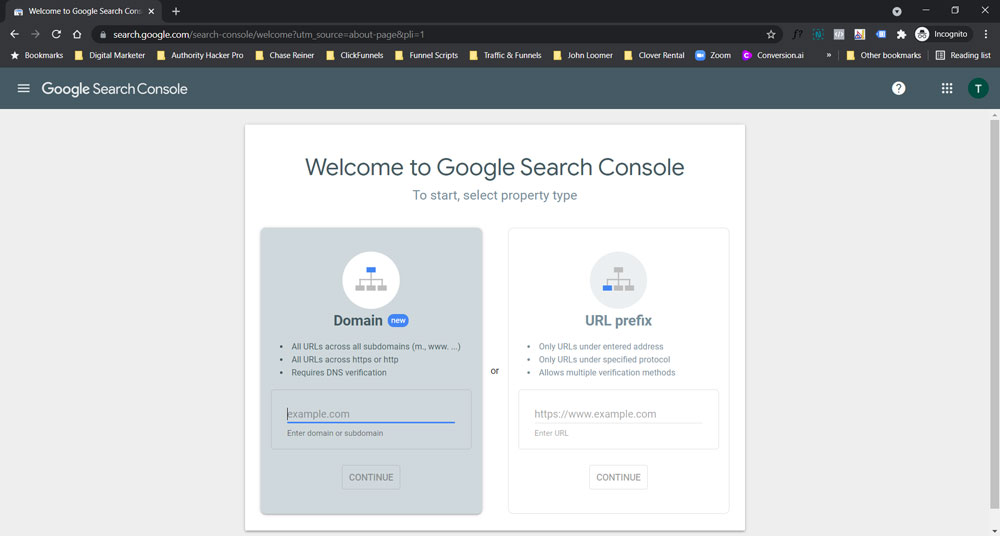
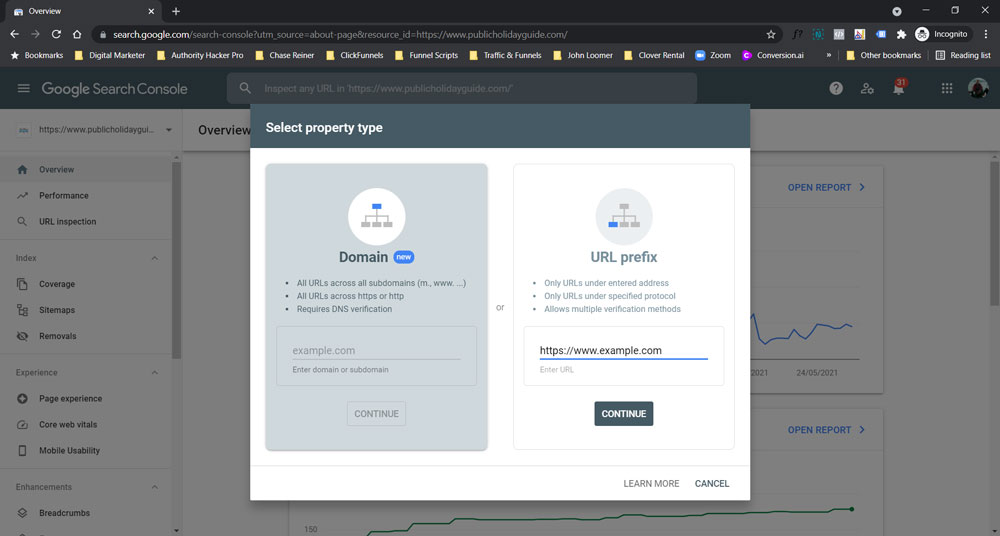
You’ll then be asked to verify ownership. You only have to do this once – not for each version of your domain. This can be done in several ways:
- HTML file: download the file and upload it to the public_html folder of your website
- HTML tag: copy the meta tag it shows and add it to the head section of your website’s Home page
- Google Analytics: if you already have Google Analytics installed just click Verify
- Google Tag Manager: if you are using Google tag Manager just click Verify
- Domain name provider: add a TXT record to your server
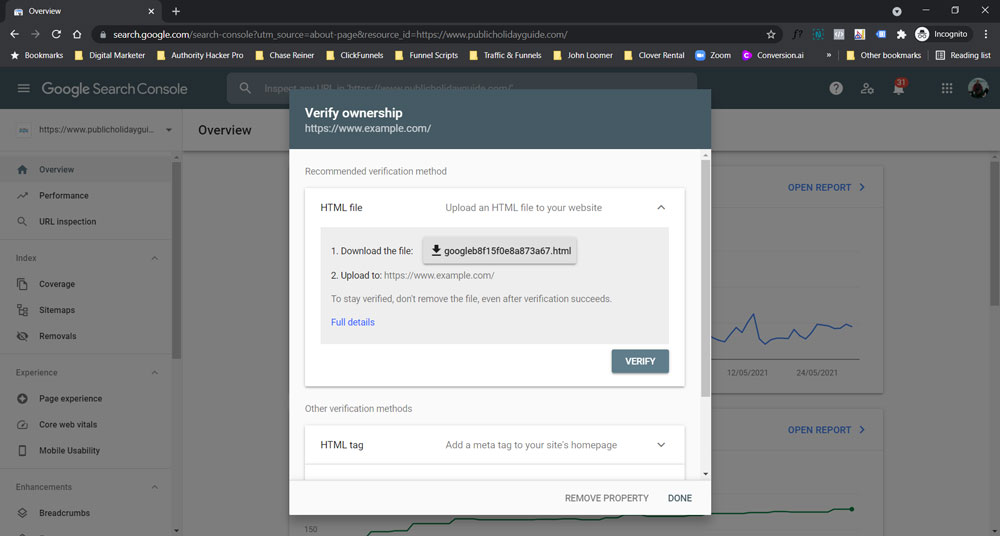
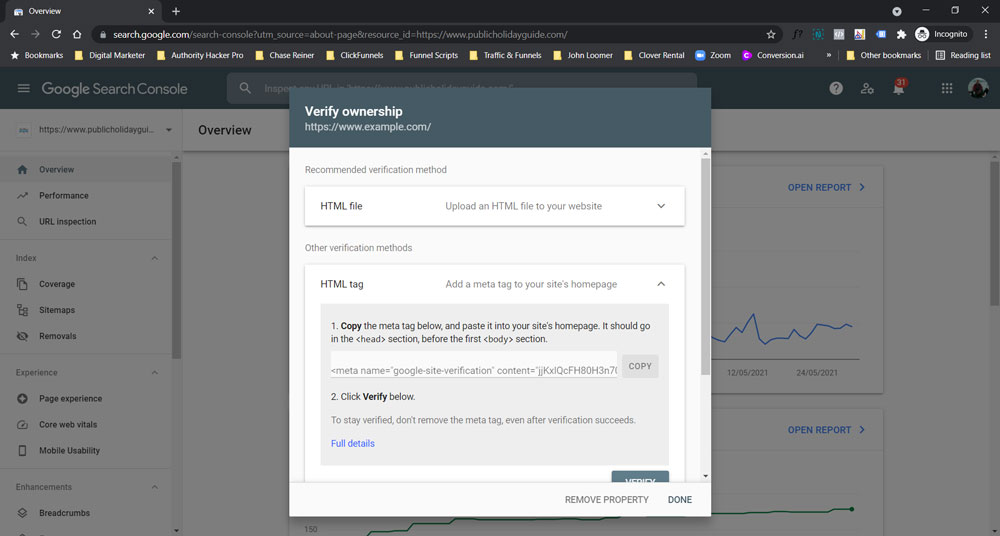
You then need to do this for each of the three other versions:
- https://example.com
- http://www.example.com
- http://example.com
If you have verified the domain already in the first step you do not have to verify each one of these again.
Adding a sitemap to Google Search Console
For the uninitiated this may be tricky but don’t be put off. It may just be easier for your SEO guys to do it – but it’s important so don’t skip it.
Sitemaps will be part of another post soon but if you use WordPress you’re in luck as this is made easy with plugins such as Yoast SEO, Google XML Sitemaps, All in One SEO Pack, SEOPress and many others. Finding the sitemap within the plugin will be similar with each one.
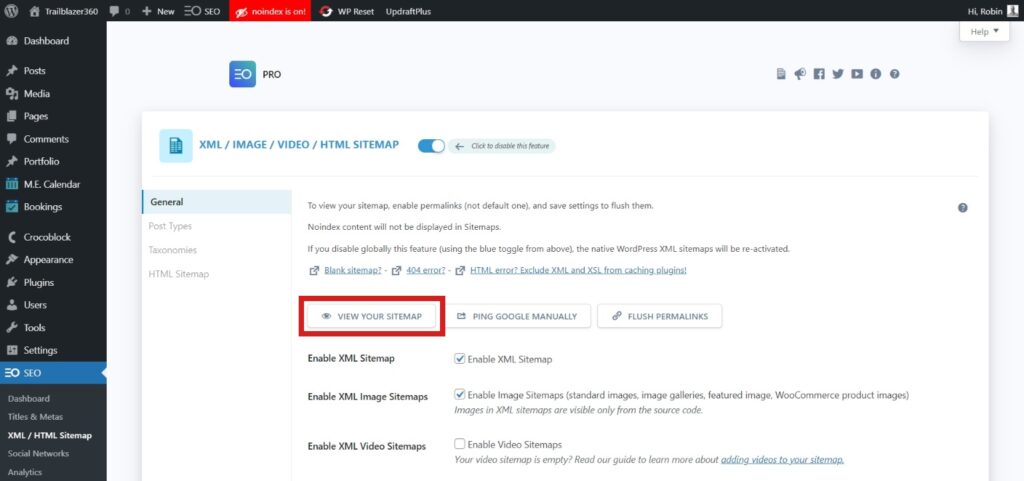
In SEOPress go to XML/HTML Sitemap and click the View Your Sitemap button. Copy the URL that appears in the address bar on the next page. It will look something like: www.example.com/sitemaps.xml.
The beauty about many of these WordPress plugins is that once submitted to Google they will automatically update when you create new content! So if I was to create another blog post I would not need to recreate the sitemap.
For non-WordPress sites you can automagically create a sitemap by visiting XML Sitemaps. This will however be a static sitemap taken at the time it was created so beware if you create any new content as you’ll need to update it.
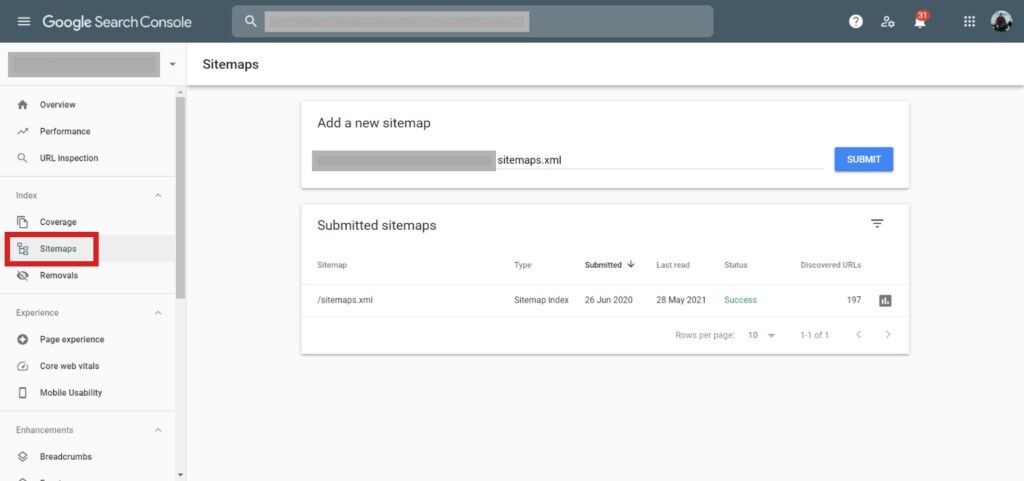
Now, return to Google Search Console > go to the LIVE version of your website from the dropdown box, top left > Sitemaps > add the end of the URL (which in our case would be sitemaps.xml) > click Submit:
Now either click Submit a Sitemap button in the email or go to the Console’s Dashboard > Crawl > Sitemaps and click Add/Test Sitemap at the top right.
In the example above you can see that 197 pages have been discovered previously on this site. This is not instantaneous. You’ll need to wait perhaps 24 hours.
Only add the sitemap for the live website, e.g. if your website is at https://www then add the sitemap to that version and NOT the others.
So, what DOES Google Search Console show?
Google Search Console does not collect data retroactively. It will begin only after you have set it up.
Depending on how recently this was you will either have no data or tons of data if your site’s a little older.
Login and you will be presented with a number of options:
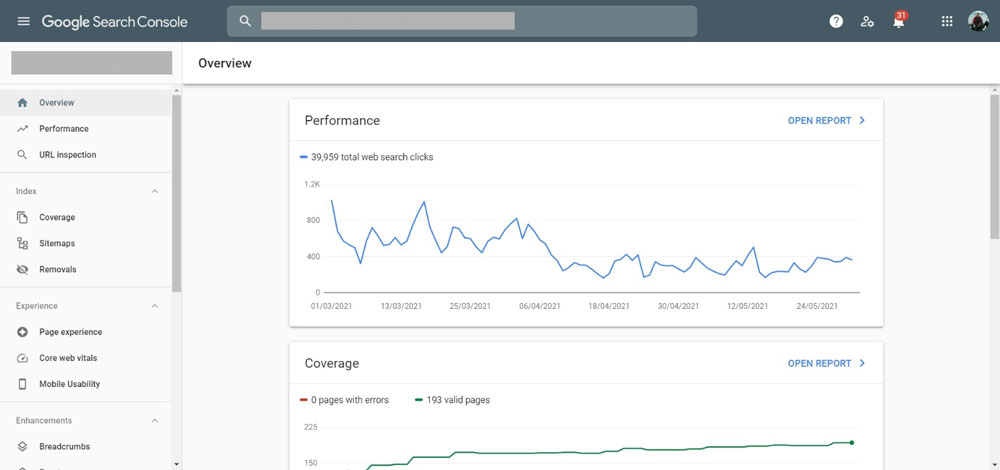
As we are concerned with what keywords our website ranks for we need to head over to the Performance report.
Google Search Console definitions
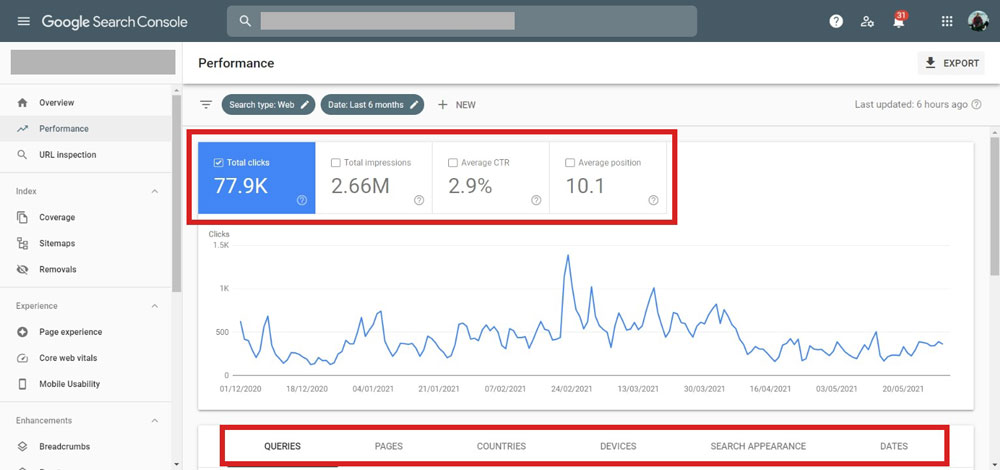
You will see four clickable boxes along the top. Each will show a new set of data:
Total Clicks: the number of clicks from organic search
Total Impressions: the number of times a page on your website appeared to the searcher for that specific keyword. If you appear on page five and the searcher does not scroll through to page five you will not count an impression. If you’re on page one then you’ll get one more impression every time that keyword is searched for. Do not mistake impressions with search volumes, i.e. the number of times a particular keyword is searched for.
Average CTR: “click through rate”: the number of clicks you received divided by the number of impressions.
Average Position: yeah! Where you appeared in search for that specific keyword.
Scroll down a little and you can filter by specific keywords, pages, countries devices etc. I suggest you have a play. It’s pretty straight forward to use.
You can also download the stats to an Excel file and play with and filter them there. At the top right is a button ‘Export’. Click it.
Why is this data important?
Knowing what keywords you appear for will help you understand what content works and what doesn’t. For example if you wrote a great piece on How to Make a Widget and it ranks on page one with tons of links, and another on How to Bake a Cake which ranks on page five with no links, then there is likely a lot you can learn from the success of the former.
This can help determine your content strategy.
Importantly you can also use it as a web page rank tracker. If you create a piece on content on “baking for kids” for example you’ll be able to see if, over time, you rank for it and have a pretty good idea of why you do or don’t.
Bing Webmaster Tools
Bing, Microsoft’s search engine, provides a similar tool to GSC called Bing Webmaster Tools and it’s like a Google Analytics and GSC rolled into one.
You can set it up in a similar way to GSC. You’ll need to create a free account and login and you’ll need to submit your site as well, as above, but you only need to submit the live version of the site – not all four versions!
Having set it up I’d recommend adding an XML sitemap here as well:
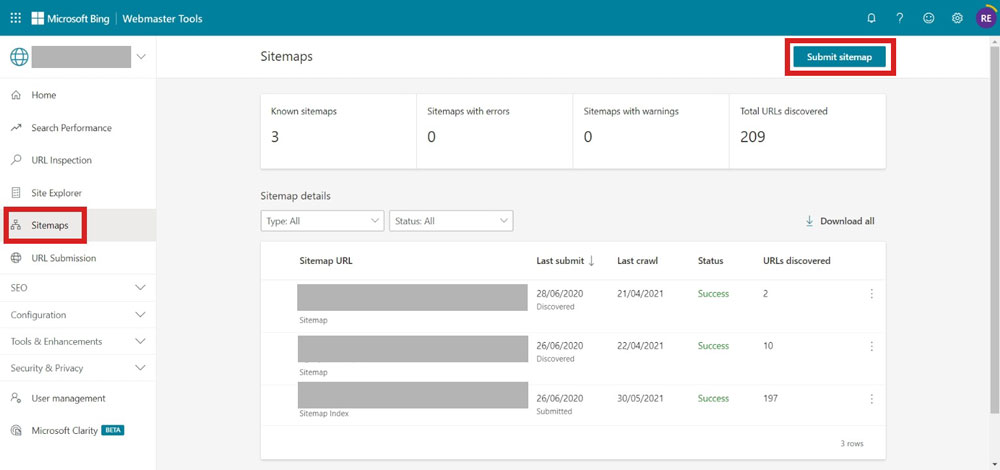
Click on your website and go to Dashboard. You’ll be presented with an overview.
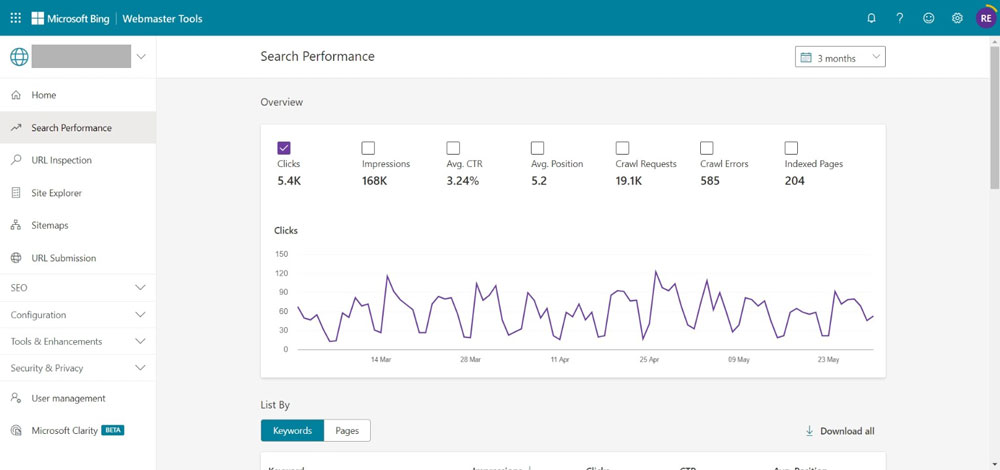
Next, click on Search Performance on the left hand side and you’ll be presented with your search data in a similar manner to Google Search Console (but with fewer options).
Again, have a play and see what you can find. For the purposes of this article the ones we’re really interested in are Page Traffic and Search Keywords.
It really is all quite self-explanatory. But if you have any problems, you know where to come.
Let us help you grow and prosper online
Call us on 0800 6122 937




Really good information here. I’m going to save this post and go through Google search console and put these into practice.
Thanks Eric. Really glad you enjoyed the article.
I’ve gone and started adding the different variations of my site to the console. When I create new posts, I usually go through and fetch as google and request indexing. Would I have to do this with each version of the site?
Also, when I added the https version it recognized me as the owner already, but when I went to add the www version it asked me to verify my identity. If I’ve already verified it with the non www how do I verify with the www version?
Hi Eric.
Good question. No, you don’t need to fetch and render for both versions. When setting up GSC you’ll need to tell Google to point to either the www or non-www version. Give your site a little time to bed in if it’s new and start appearing in search results then return to the Search Analytics section and look at both sites. One should have zero results, the other quite a few, i.e. the one you instructed Google to point to should be the one with the results. You only need to submit to that one.
When you say “the HTTPS version” … and “the www version” you’re not comparing apples with apples. Did you mean the www version and the non-www version? Or the HTTP version and the HTTPS version?
You should go through the same verification process for both the www and non-www. I usually verify sites with Google Analytics (one of the options) or download a file to my server. GSC may have sent you a verification email.
NB: remember to add both the HTTP and HTTPS versions. You’ll end up with four versions of the site: www and non-www for both HTTP and HTTPS.
Hope that helps.
Robin
Thanks for the help man. I appreciate it. I got the 4 versions up like you said. And I’ve got my preferred one picked. Thanks again.
That’s my pleasure, Eric. Glad I could help. Let me know of I can help again.
Happy travels,
Robin